Accessing Domain Emails with Office 365 (Exchange Online)
If you already have an Office 365 subscription, you can use Exchange Online to access your domain email accounts.
In this article, we will show you how to connect your domain email accounts with your Exchange Online.
Domain email accounts are not supported on Outlook.com
Note that this article is not about connecting your domain email account to an Outlook.com account. Outlook.com no longer support custom domain email account. If you have previously set up Outlook.com with your domain email address, you will still be able to send and receive emails. But all new domain email accounts will have to use Office 365. Office 365 is a paid service, starting at $5/month per user.
Getting started
Pre-checklist:
![]() Create your domain email address
Create your domain email address
![]() Obtain your email client configuration settings from View Email Client Info in your Doteasy Member Zone
Obtain your email client configuration settings from View Email Client Info in your Doteasy Member Zone
![]() Signup for a Microsoft Exchange Online account
Signup for a Microsoft Exchange Online account
Note: that in order to set up your domain emails with Exchange Online, you need to be comfortable editing your domain DNS records as you will need to make MX record changes to your DNS records to point your mail service to Microsoft Exchange. Also, it normally takes 24-48 hours for the MX record change to take effect.
Confirming your domain ownership
The first step to setting up your domain email with Exchange Online is to verify your domain ownership.
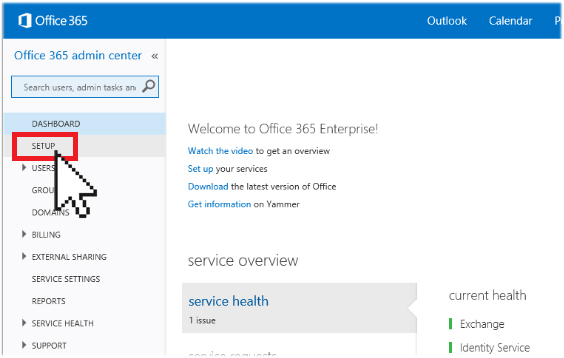
- Sign into your Office 365 Admin center.
- From the side menu, select Setup. This will start the Office 365 wizard.

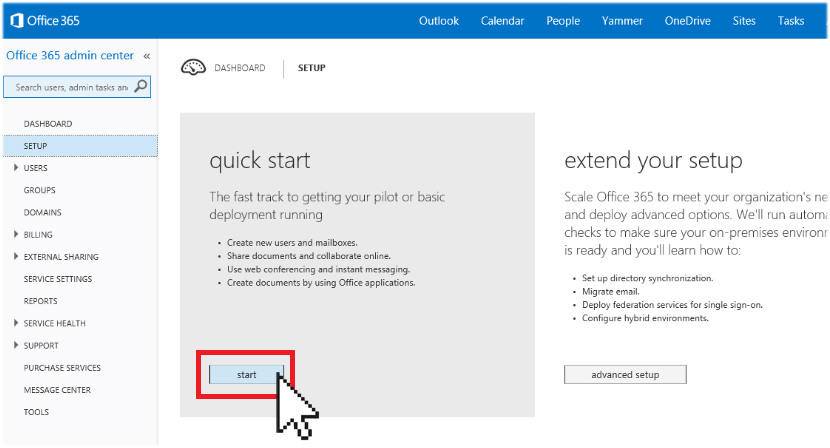
- On the Quick Start panel, click Start.
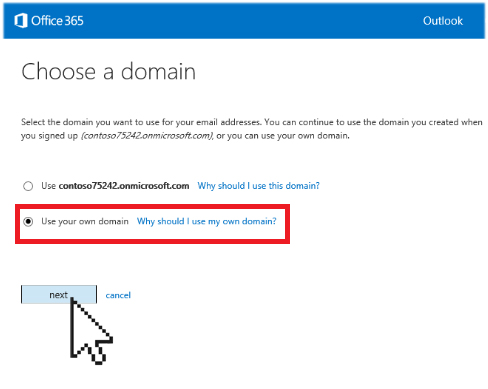
- On the Choose a domain window, select Use your own domain and click next.
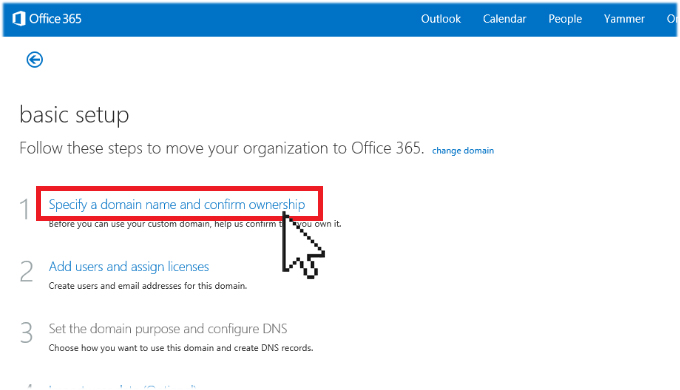
- Next, the wizard will guide you through the steps to add your domain to your Office 365 account. Click Specify a domain name and confirm ownership to continue.
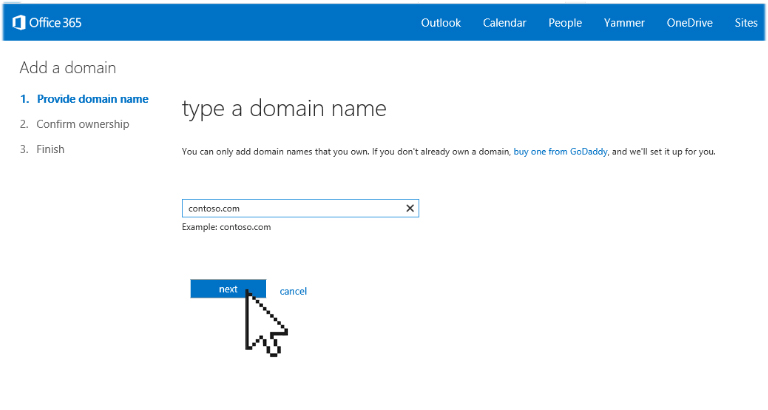
- On the next screen, you will be asked to provide your domain name. Enter your domain name into the text field. When ready, click next.
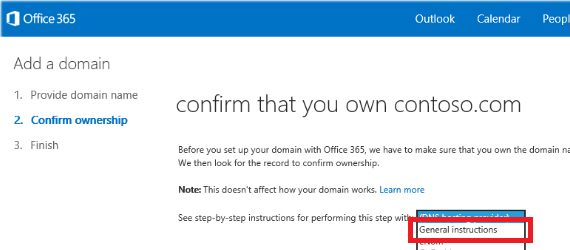
- On the ownership confirmation window, select General instructions from the drop-down menu.
- To confirm your domain ownership, you can follow any one of instruction choices provided:
- add a TXT or MX record for verification
- add an MX record to route email
- add four CNAME records
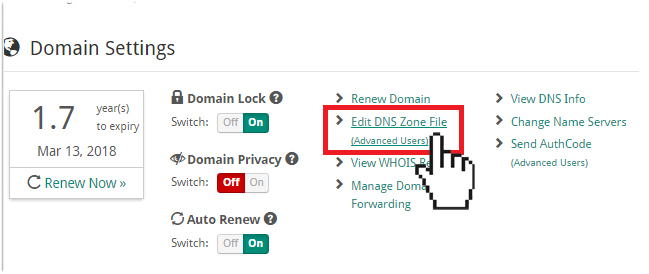
All these can easily be done via the Edit DNS Zone File tool in your Doteasy Member Zone.
Providing domain ownership by creating an MX record
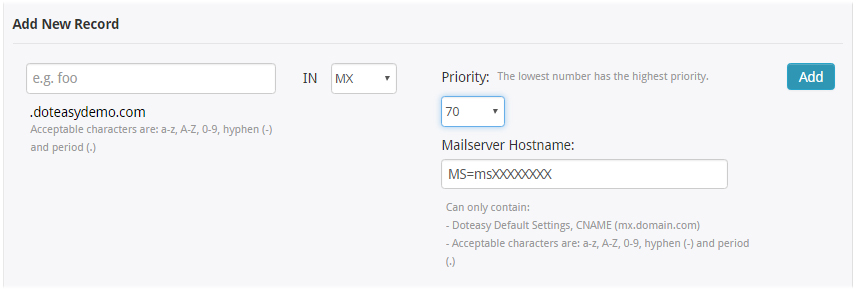
If you want to prove your domain ownership using the MX record method, you will enter the MX records in your Doteasy Member Zone like this:
*Note that the MS=msXXXXXXXX is just an example. You will need to use the specific value provided on the Domains page in your Office 365 Admin Center.
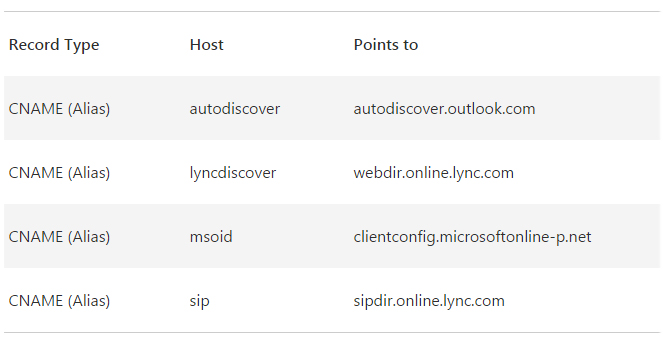
Providing domain ownership with four CNAME records
If you want to prove your domain ownership using the four CNAME records method, you will enter the CNAME records in your Doteasy Member Zone like this:
Follow this example to create the remainder 3 CNAME records.
*NOTE: remember to click on the Publish DNS Records to complete the process.
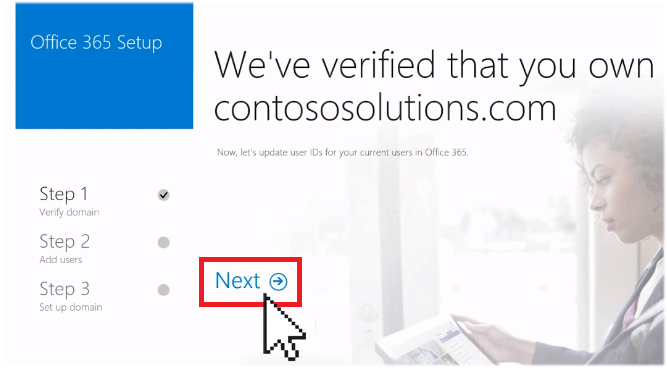
- Once you have added the MX or CNAME records, you will need to return to your Office 365 Admin Center to complete the setup process. After Office 365 detects the correct MX or CNAME records, your domain is verified. You can now proceed to setup your domain email accounts on Office 365.

Setting up domain email accounts on Office 365
Once Office 365 has verified your domain ownership, you can start setting up your domain email address via your Office 365 Admin Center control panel.
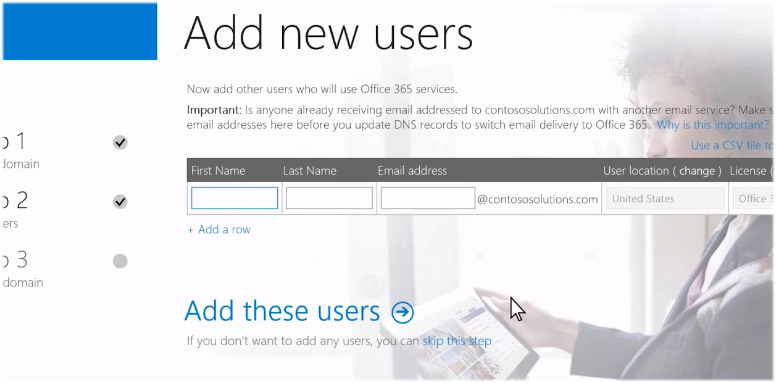
- In the Office 365 setup wizard, after you’ve verified your domain ownership, you can update the email addresses for yourself and other people already on your Office 365 account. You will be asked to sign out of your Office 365 account to complete the update.
- Once you’ve signed back into your Office 365 Admin Center with your updated email address (your password stays the same), you will be prompted to add anyone who has an email address at your domain. Make sure you add all your domain user email accounts so that you don’t lose any emails when you switch from Doteasy to Office 365.
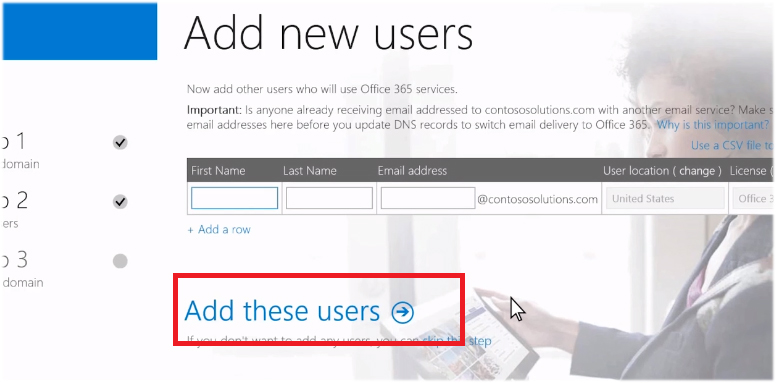
- When ready, click Add these users to complete this step.
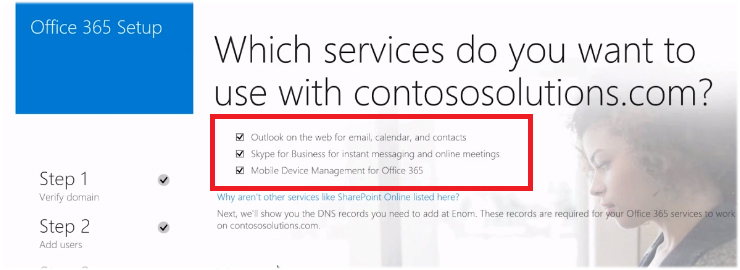
- Once you have added your users, you will need to make the necessary MX record changes. Select the No, I have an existing website and prefer to manage my own DNS records option. When ready, click Next.
*NOTE: If you choose the Yes, I want to transfer DNS management in the next step, you will be changing your entire DNS records to Office 365, which includes your email services as well as website hosting and other services. If you already have a website setup with Doteasy, it will cause disruption to your website.
- You can leave the default settings on the next step. Click Next to continue.
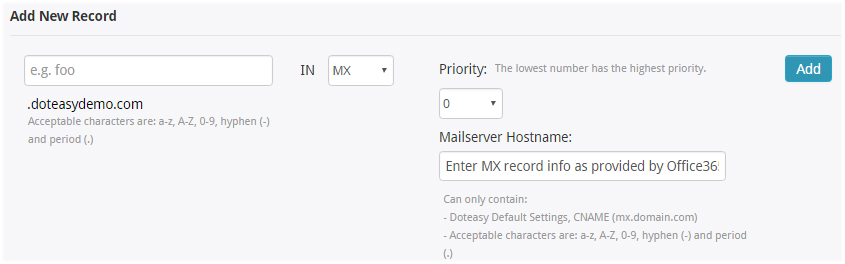
- Next, you will need to add a new MX record on your DNS panel at Doteasy. Login to your Doteasy Member Zone and click on Edit DNS Zone File.
- Add the new MX record as provided by Office 365. For example,
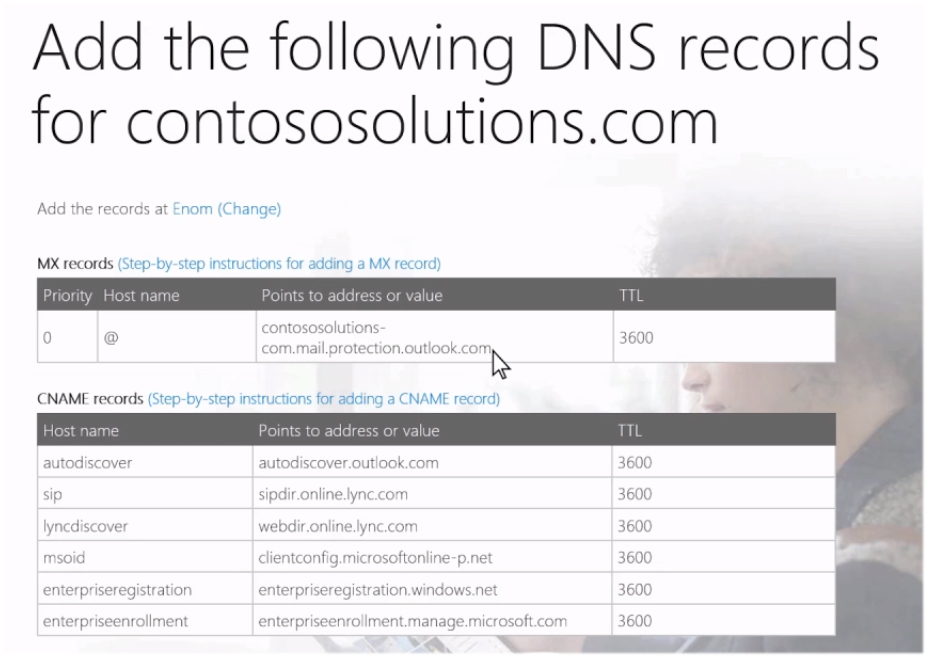
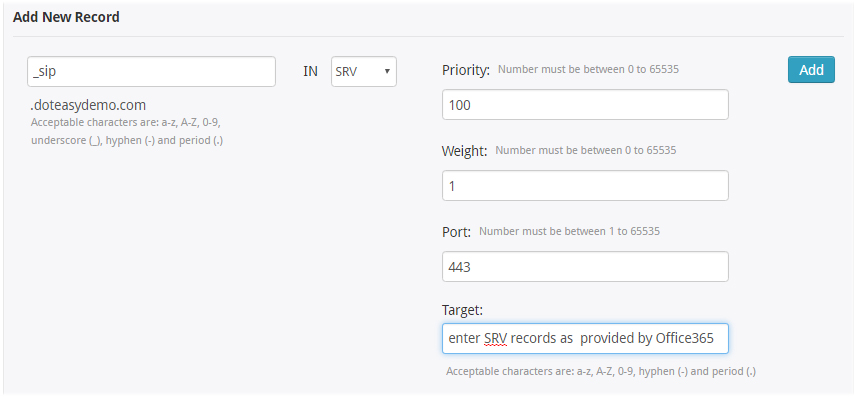
- Continue adding the remainder of the DNS records as instructed by Office 365. For example,
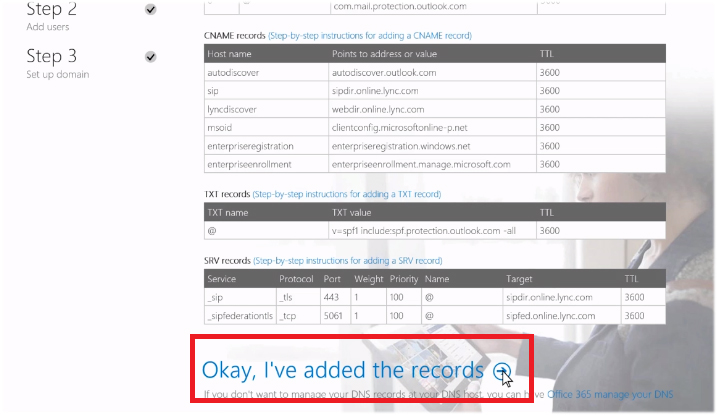
- Once you’ve added all the required records, click Okay, I’ve added the records.
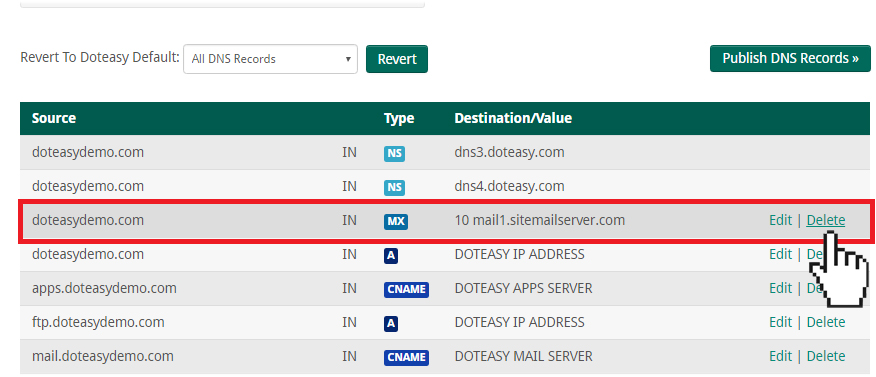
- And you’re all set! You can now remove the original Doteasy MX records from your domain DNS panel.
*NOTE: MX record changes typically take 24 to 28 hours to take effect.